In this section I have gathered together some of the ideas and methods that have helped me as a Smocker and a Smocking Teacher. I hope that these Tips are useful to new and experienced Smockers.
Getting Started with Smocking
To get started with Smocking, here are a few suggestions.
Fabric: Choose a good quality fabric, preferably Cotton or natural fibre.
Pattern: You’ll need a Pattern to cut out your fabric. Often the Smocking is done on the fabric before the pattern is cut out. If you are making a dress with smocking on the front you will cut a piece of fabric in a rectangle shape. For a bishop style you will cut five rectangles and partially construct before you start smocking. All this information with measurements should be in your pattern.
Smocking Plate: A Smocking Plate shows the design for smocking. It usually has a photo of a design, a grid and written instructions
Pleating: You need your fabric pleated to do your smocking. This is done using a Pleating Machine or Iron on Dots. The pleating usually draws your fabric up to about three times the finished smocked piece. If you need fabric pleated I offer a Pleating Service.
Threads: Stranded Cotton is most commonly used for Smocking but experiment with different threads, Perle, Silk, are suggestions.
Needles: Embroidery or Crewel needles are ideal. Choose a needle you’re comfortable with and has an eye big enough to thread three strands of cotton.
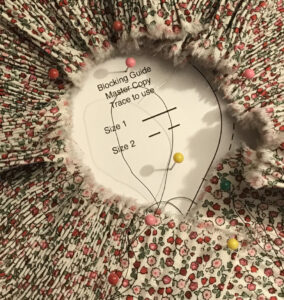
A Blocking Board: It is very important to Block your pleated fabric to size. There should be a guide in your pattern indicating the length to tie the pleating threads. The fabric can be pinned to an Ironing Board, a Corkboard or Polystyrene block, tied to the correct smocking width and then steamed. Make sure your iron doesn’t sit on your fabric but is steamed from above the fabric, be especially careful if using Polystyrene.
Scissors: A good pair of embroidery scissors.
Stitch Instructions: Smocking can use a variety of stitches but the basic ones are Cable, Wave and Trellis Stitches. You can learn these stitches from numerous books, I’d recommend The A-Z of Smocking Stitches. Google can be helpful. I have a Stitch Section in My Tips For Smockers section with some illustrations of basic stitches.
You’re ready to start!
Smocking Stitches
Smocking is made up of Three Basic Stitches -Cable, Wave and Trellis.
I’ve made some Videos to show how these Stitches are done for Right and Left Handed Smockers. Hope they help!
Pleating your fabric
Fabric Preparation for Pleating
Pleating can be done by machine or iron on dots.
It is important that your fabric is perfectly straight to be successfully feed through a Pleating Machine or for Iron On Dots to be straight. Either pull a thread, rip the fabric or very carefully measure.
Iron Dots
Follow the instructions provided when Iron On Dots are purchased. Usually they are ironed onto the back of the fabric and then picked up to make pleats. A bit time consuming but if that’s your only option it can work well.
Pleating Machine
- Roll the fabric onto a rod making sure it is even.
- Place required number of needles onto the Pleater. To stop them from falling out place something solid under the front of the pleater to angle it up. Do up screws.
- Cut thread to required length, I prefer Quilting thread. Thread needles. I lay the threads across the pleater from front to back and thread at the top of the needle.
- When threaded, gather the bottom threads, make them close to the same length and tie in a loose knot. Flip the unknotted threads over, hold all threads and straighten with the knotted threads being longer than the unknotted.
- Place the rod with the fabric behind the needles. This is the top edge or your fabric.
- Carefully sit the fabric square with the needles with the top edge 1 or 2 spaces from the first needle.
- Gently turn the handle and start pleating making sure the fabric is straight.
- As the fabric feeds through the pleater gently pull forward from the middle of the pleating so that there is not too much strain on the needles.
- When all the fabric has feed through the pleater gently pull off the needles.
- The threads are double so pull the top thread carefully and unthread from the needles. The top thread was not knotted so should pull through.
- Now you’re ready to Block your pleating to size.
Click link for photo illustrations of Using a Pleater
Fabric Blocking
It is important to Block your pleated fabric as this holds the shape of your finished work.
Please click below for instructions on how to block a Bishop or Yoked Dress
Instructions for Constructing a Dress Yoke
Click here for Photo Instructions for yoke
Please note this may take a little time to download!